
How to Photograph the Aurora
 Silvana Della Camera
We are entering a wonderful time to experience the aurora close to home. Learn how to plan and photograph this most beautiful and elusive event.
Our Sun is currently increasing its activity, which is evident from the appearance of numerous sunspots on its surface, flares, and Coronal Mass Ejections (CMEs). These phenomena have a significant impact on Earth since everything on our planet is influenced by the Sun. As we are entering the solar maximum phase, the effects of the Sun’s heightened activity are becoming more noticeable.
In this post, we will focus on discussing the tools required to plan and capture photographs of the aurora with your DSLR or mirrorless camera. The aurora is a breathtaking natural phenomenon that occurs as a result of the CMEs striking Earth. The CMEs create geomagnetic storms on Earth. The higher the intensity, the greater the area the aurora can be seen on Earth. The CMEs also create radio interference causing blackouts. The colors of the aurora are dependent on the intensity of the CME. Kp index is the measurement of geomagnetic activity. There are magnetometers around the world that measure this value. The higher the number, the wider the area the aurora can be seen.
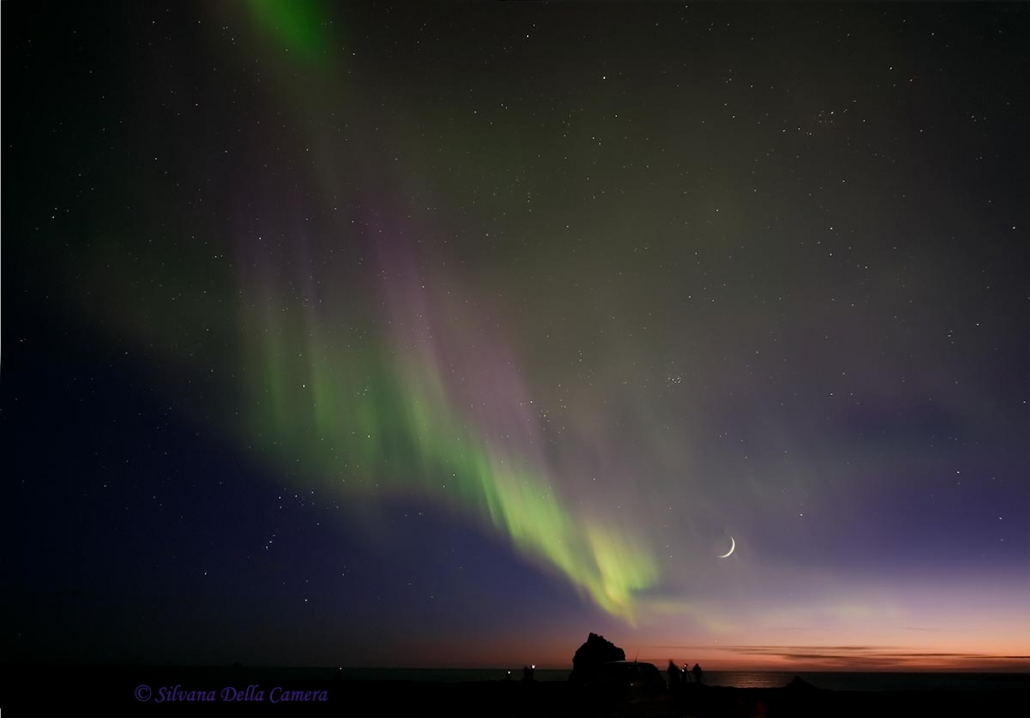
Iceland
📷 – Nikon D810
🔘 – Nikon 14-24 mm
🎞 – ISO 1400
🔘 – f/2.8
🕒 – 4 seconds
What is the Aurora?
Before we dive into photographing the aurora, what exactly is it? The aurora, also known as Aurora Borealis and Aurora Australis (the Northern and Southern Lights), is a natural phenomenon that can be observed in locations near the magnetic poles of Earth. These curtains of light are always moving, which makes them difficult to predict. However, when the Sun has a strong coronal mass ejection, the aurora expands southward (in the case of the Northern Hemisphere) and northward (in the case of the Southern Hemisphere). This means that places that would normally rarely see the aurora, can now witness this incredibly beautiful event. The colors are determined by the altitude of the aurora and the gases that are being energized by the CME.


Iceland
📷 – Nikon D810
🔘 – Nikon 14-24 mm
🎞 – ISO 1400
🔘 – f/2.8
🕒 – 8 seconds
Tools
First off, forget about using the news outlets for aurora forecasts. They are at best superficial and more clickbait than actual information you can use.
Apps. These are powerful and detailed. Two elements that are important when stalking aurora. I utilize two aurora forecast apps specifically. I use Android devices but these should be available on other platforms too.
SpaceWeatherLive – also has a website. The app is free and also subscription-based. ($.99 per month)
My Aurora Forecast – Android and IOS. Free and Pro version ($3.99 one-time purchase)
Astrospheric is my go-to cloud forecast app. It is free and subscription-based.
Space Weather website is another resource I use.
The Apps
SpaceWeatherLive
This app is powerful It provides all things Sun related including sunspot information, CME, solar wind, and so much more.
Generally, the Kp index for New England is low, approximately +/- Kp 3. This value means the aurora’s visibility is only in a location close to the magnetic poles. For the aurora to be seen in the lower latitudes, the Kp has to be a high number.

My Aurora Forecast
Like SpaceWeatherLive, My Aurora Forecast is packed with helpful information to assess the probability of aurora for a given location.


Understanding What the Numbers Mean
To know when to start looking for the aurora, an understanding of the Kp index is required. When a CME is in line with Earth, geomagnetic storms occur. The intensity of a CME directly influences the strength of the geomagnetic storm, expanding the area and lowering the latitudes at which the aurora can be observed.


Stalking an Aurora
The aurora is an elusive event. When the Kp index is at least 7 for the New England area, it is still not definite that it will be visible. Dark and clear skies are preferred to increase the chances of seeing it. Find a location and hope for the best.
I’ve chased the aurora in New England more times than I can count. More often than not, it was a miss. However, this dismal statistic doesn’t deter me.
Remember that your camera can see the aurora even if your eyes can’t. Use your camera to determine if the aurora is actually visible. Don’t judge by your eyes.
The camera settings are straightforward. Start with these camera settings to photograph aurora borealis. Depending on how intense it is, you adjust the ISO and shutter speed accordingly.
- Fast, wide-angle lens.
- ISO 1000~3200.
- Shutter speed 1 second to 4 seconds.
The key is to keep the shutter speed relatively fast. Do not be tempted to shoot long exposures. The details of the aurora will be lost. The longest shutter speed I’ve used to photograph the aurora was 8 seconds.
Keep an eye on the histogram.
The aurora can move very fast!
The Holy Cow Moment
Friday, May 10th, 2024 – The Sun sent out a huge blast of energy hurtling towards Earth. Aurora alerts were up.
I spent hours festering over cloud forecasts and Google Maps trying to determine a location where I could see the aurora with no clouds. In the end, frustration set in due to the crappy forecast, so I stayed put. Clouds are the bane of my existence.
Backyard trees would be framing the aurora if I was able to see it. Contrary to the forecast, the clouds lifted and the stars emerged. Maybe there was a chance.
The apps noted an increase in the Kp index in my area so the potential was there to see it! This is how the Kp index appeared on my apps at the height of the aurora.
I couldn’t believe what I was seeing. The Kp index kept rising until it reached Kp 9.
Holy G5 Storm, Batman!


I kept checking the sky with my camera and I started to see shades of green on the LCD. AURORA! Suddenly my eyes picked up a pink color, ever so faint. What my camera saw was not pale at all. There were shades of deep magenta, pink, blues, purple, and green. What a dance of color!! Exquisite to behold!
The result of the G5 storm was magnificence on high, viewed right from my backyard southwest of Boston. Granted the trees weren’t the best foreground but I didn’t care. I could see and photograph the aurora!
This is a timelapse shot for roughly an hour. There are several bursts of intensity in this. The magenta color was insane! Yeah, I messed up on the title – it should note Kp 9 and not Kp 8.
Thank you, Sun, for the incredible and humbling experience. ☀️❤️ I anxiously await your next show.
My Backyard in Massachusetts
📷 – Nikon Z9
🔘 – Nikon Z 20 mm
🎞 – ISO 3200
🔘 – f/1.8
🕒 – 1.6 seconds
1302 frames
The CME created magic on high. The resulting G5 geomagnetic storm created dazzling aurora worldwide, in areas where the aurora is rarely seen.
Did you see the aurora? Let’s hear about it in the comments!
© Silvana Della Camera
To learn about upcoming workshops and tips on photography, consider subscribing to my website.
Taking photos and want to make them more compelling?
Art isn’t just for walls. Art is also to hold in one’s hands.


 Silvana Della Camera
")
 Silvana Della Camera
 Silvana Della Camera

 Silvana Della Camera


I saw the May aurora in South Natick! I stood in my backyard for about an hour and saw a wide variety of colors. I was thrilled!
So glad you saw it! Seeing the aurora is like nothing else!
Thanks again, Silvana, for this wonderful article on the aurora borealis. As you know, we were like kids in a candy store on Christmas morning the past two years. I observed and captured the August 2024 aurora that occurred on the peak night of the Perseid meteor shower and so captured both. I also captured the October 10, 2024 aurora and the recent Veteran’s Day 2025 aurora. I agree. The Northern Lights are my favorite.