How to: Create a Timelapse
 Silvana Della Camera
As a photographer, my world revolves around the capture of a moment.
A frozen sliver of time.
For me, this quote, by the master Dorothea Lange sums it up: “Photography takes an instant out of time, altering life by holding it still.” This is the magic that a photograph possesses and never loses. It is a time machine.
I have never been entranced by the creative process of making a video, although I respect and admire the creativity and talent that goes into the making of them. Having said that, I have been fascinated with timelapse for as long as I can remember. It’s technically a movie, but it is quite different since it is a series of these frozen moments strung together, ultimately compressing time. What is marvelous about time-lapse is that it allows us to see what we are unable to see naturally. If you’ve ever seen any of the BBC’s documentaries, “Earth”, “Secret Life of Plants”, or the PBS programs “Nova” and “Nature”, you’ve experienced this altered reality and it is riveting.
Digital cameras have made timelapse accessible. In the past, film was used for time-lapse and it was not an easy endeavor as it is in the digital era.
When creating a timelapse, the hardest challenge for a photographer is to think about time itself. We know how to compose and expose but it is applied in a singular model. Shooting timelapse forces you to think past that instant you are so focused on capturing. It’s no longer look and take a shot, but now think about what else could exist in that scene you are looking at but are incapable of seeing. What is there that is moving so slowly that we are unable to naturally see?
In our world, every moment is alive with motion. Some movements are swift and easily perceptible to our senses. Yet, it’s the gradual, unhurried changes that often evade our notice. Consider the delicate unfurling of a seedling, the majestic journey of the Milky Way across the night sky as our planet turns, the mesmerizing dance of clouds as they form and disperse, and the gentle, yet profound, transformation of landscapes and our lives through the ever-shifting seasons.
See What I Mean?
A sky filled with clouds reveals patterns when captured with a timelapse on an Autumn Day. Stringing together hundreds of frames reveals the action otherwise hidden.
A seemingly flat-looking sky reveals much more in a timelapse. This was photographed during a quest for a full Moon rise over Boston. The Moon appeared in what felt like a blink of an eye. The timelapse however revealed the movement of the thick clouds that obscured the Moon as well as the cars on Storrow Drive, the boats on the Charles River, and the planes departing from Logan Airport.
Boston Time-Lapse
You Can Do It
Photographers have the perfect tool already in hand to create a timelapse. If you have a DSLR or a mirrorless camera, a sturdy tripod, an intervalometer (either internal or external), and an ND filter (for daytime timelapse) you are good to go!
My camera has the option to create a time-lapse movie automatically or fully manually. If your camera has the ability, it’s a quick way to create a time-lapse with the camera doing all the heavy lifting for you. Depending on your camera, you may not have the option to edit each frame after the fact but it is an excellent way to experiment with frames per second and intervals before setting out to create one from scratch.
A Little Math
If you are ready to build a time-lapse, decide on the frame rate, aka frames per second (fps) for your time-lapse. This value can vary but for time-lapse, you can use 24 or 30 fps to start with. Frame rates can go up to 240fps for 4k video. A minimum of 10 seconds for your finished time-lapse is recommended or the viewer will feel shortchanged. The calculation for the number of frames you need is straightforward. First, decide on the frame rate, and then the desired length of your time-lapse.
Example:
I’m going to use 30 fps for my time-lapse video and I want it to be 20 seconds long.
I know that every second of the time-lapse video requires 30 images.
For a 20-second time-lapse video, I need 30 x 20 seconds = 600 images.
For 24 fps, you need 24 images for each second of the finished video. You get the idea.
Calculating the Frames
I use this app, TimeLapse Calculator, when planning a long-duration timelapse shoot. Enter the interval, the duration of the shoot, and the frame rate (fps) and it provides info. You can also enter your camera’s sensor size. Important to know how large your memory card needs to be. It also has a built-in timer. This is a free app on Android and similar,


So Many Frames, Oh My!
Don’t be afraid of shooting hundreds (possibly thousands) of images for a time-lapse. Your camera can easily handle it. If you have an older camera and worry about the number of shutter actuations, a shutter replacement is one of the most inexpensive fixes you can do to your camera. Don’t let this stop you from trying time-lapse. I’ve never had a shutter fail.
OK, What to Shoot?
You can dip your toes into time-lapse photography by photographing puffy white clouds. Depending on how fast they are moving, you can have short intervals between shots or long. Rule of thumb – fast-moving clouds need a shorter interval, and slow-moving clouds need a longer interval between each frame. Clouds are a great subject to start with. It will give you an understanding of how intervals impact the end result. Any subject at all qualifies for timelapse.
Slow Down the Shutter
One of the caveats of creating a timelapse is the shutter speed. A fast shutter speed gives a timelapse an unnatural jittery feel. Slow the shutter down to a maximum of 1/60 second (when using 30 fps) or 1/50 second (for 24 fps). Slow the shutter in bright conditions by using a neutral density filter. This technique is used by the movie industry and is called the 180-degree rule. It gives the resulting timelapse a natural feel of movement.
Tools of the Trade
I’ve been creating time-lapses for quite a while now and have tried many tools for the task. In my opinion, LRTimelapse is the gold standard for assembling them. You can try the tool out for free and it will handle up to 400 images in this version. If you want to learn the best practices for creating time-lapse this book, Time-lapse Photography from Photo to Film is terrific, also by the author of LRTimelapse, Gunther Wegner.
Photographers beware, it is an addicting, fascinating, and satisfying endeavor.
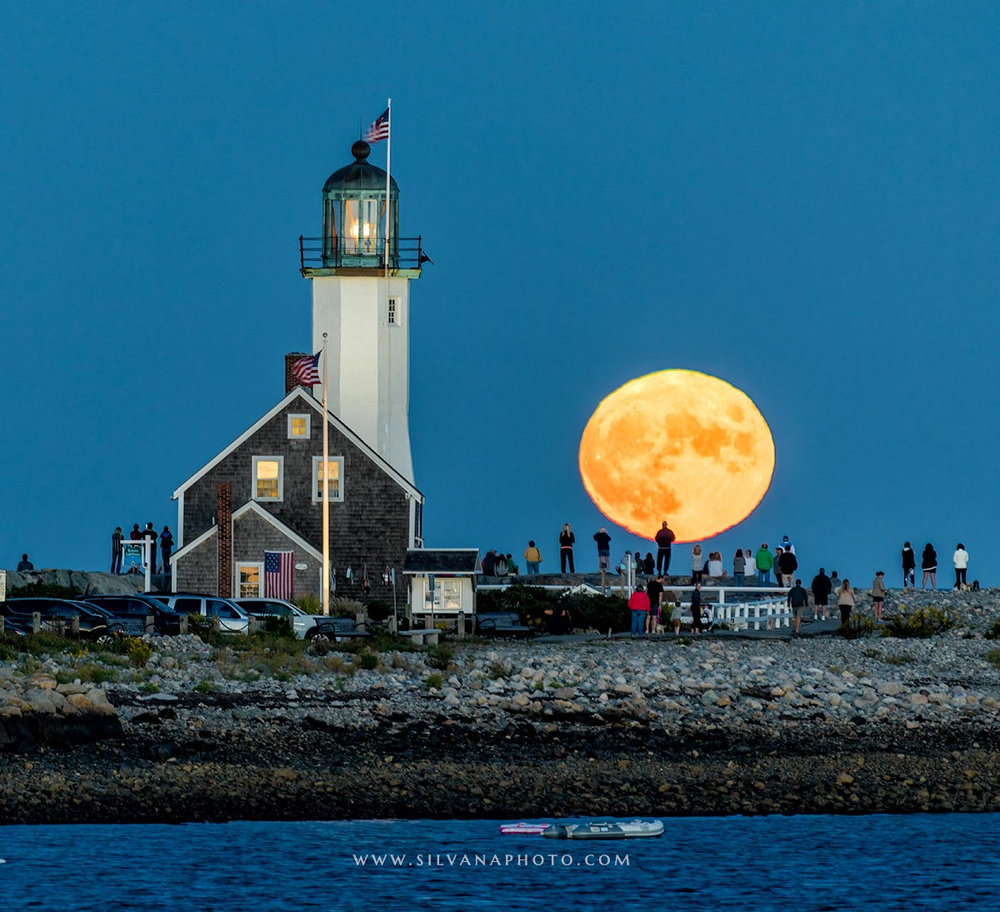
When we look at a lighthouse, we see the moving light. However, in a timelapse, the moving beam seems to dance with the clouds and the core of the Milky Way.
This time-lapse was shot on a very rare incredibly clear summer night. Notice the high-level clouds and their movement.
When you assemble the timelapse, the footage can be combined with still images as well. You can also string a bunch of timelapse sequences together.
Have you been hooked by time-lapse? What have been your challenges? Let’s hear about it in the comments.
© Silvana Della Camera
#photographer #timelapse #photography #creative #inspiration
To learn about upcoming workshops and tips on photography, consider subscribing to my website.
Taking photos and want to make them more compelling?
Art isn’t just for walls. Art is also to hold in one’s hands.


 Silvana Della Camera
 Silvana Della Camera
 Silvana Della Camera
 Silvana Della Camera


Awesome!