How to: Create a Moonrise Timelapse
An image of a full Moon is enchanting. However, a moonrise timelapse leaves enchanting behind and gives the viewer a visceral kick in the head.
A moonrise can be a challenge to photograph, especially when the Moon is full and rises after astronomical twilight and you’ve set your sights on a foreground object that is in a dark location. In this scenario, it is especially difficult as the Moon will immediately blow out any foreground element. You can light paint the foreground; however, this isn’t always an option when you have in mind to use a long lens. For example, photographing a moonrise at a lighthouse from two miles away.
A civil twilight or blue-hour moonrise is most opportune in these situations as there is sufficient light for the foreground and the full Moon‘s incredible brightness is tempered by the remaining light from the Sun which is now just below the horizon. If shooting in a location that has a lot of ambient light, a moonrise is feasible when it’s dark as the foreground is already well-lit.
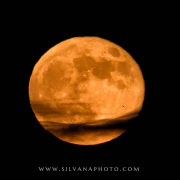
When the Moon is low on the horizon, the Earth’s atmosphere gives the Moon a wonderful rich orange or deep yellow color in place of its normal silvery sheen. If you have the option to shoot at sea level, a moonrise has a great visual impact. The Moon reflects off the water and appears to be liquefied until it rises above the horizon. The edges and overall shape of the Moon appear distorted when it is on the horizon. Likewise, a Moon set at sea level has a comparable impact, albeit reversed in motion.
Below, is a sequence of frames from a full Moon rising in total darkness at the coast in Maine.
Nikon Z9 | 500mm lens | ISO 500 | f/4 | 1/5 second.


Set-Up
To begin, set the exposure right before the Moon starts to appear. As always, shoot RAW, and use manual mode, as aperture priority will skew the exposure once the Moon appears.
Rule of thumb for shutter speeds: If you plan to use a frame rate of 30 fps, your maximum shutter speed should be no higher than 1/60 sec. For a frame rate of 24 fps, go no higher than 1/50 second. Adjust the aperture and ISO accordingly. Keep an eye on the histogram. You shouldn’t need an ND filter, but do use one if your shutter speed is over the recommended for the selected fps. This follows the 180-degree rule that cinematographers use that imparts a smooth, natural look to movies and thus to your timelapse.
The Moon rises fast, so keep a short interval between each frame, 1 or 2 seconds maximum. This will generate enough frames for a timelapse before the Moon becomes overly bright and begins to blow out. To create a 10-second timelapse, shoot a minimum of 300 frames for 30 fps or 240 frames for 24 fps is needed. With timelapse, always shoot more than you think you need. A minimum of 10 seconds of footage is required or your viewer will feel shortchanged. The video will feel “off”.
Utilize Lens Compression
A long lens will give the Moon a huge presence thanks to compression, relative to your foreground. Plan out your Moon rise (or set) using a planning app, like Plan It! Pro or PhotoPills.
Below is a screenshot of Plan It! Pro while planning a moonrise at Scituate Lighthouse using a 500mm lens.

The greater the distance between the subject and your camera, the bigger the Moon will appear in your image. Below, are two examples using a 500mm lens.
Scituate Lighthouse. Shot from about 1 mile away with a 500mm lens on a very windy day. This timelapse is comprised of 645 frames.
Nikon D850 | 200-500mm @ 500mm | ISO400 | f/5.6 | 1/8 second
Below, Nubble Lighthouse, shot from about 2 miles away using the same focal length. The Moon looks enormous compared to the one above. This is the beauty of lens compression.

The Moon looks like it had its top sliced off thanks to the thick cloud cover. Once the Moon is high, it will become very bright and will become blown out in the exposure.
Post Process It
After processing the sequence, you can use any software that allows you to create a video. If you are on a Windows system, you can use the built-in video editor. If you are a Lightroom user, you can use LRTimelapse to create the timelapse.
What are your favorite types of Moon images? Let’s hear them in the comments below.
To learn about upcoming workshops and tips on photography, consider subscribing to my website.
Taking photos and want to make them more compelling?
Art isn’t just for walls. Art is also to hold in one’s hands.
Want to explore New England through a camera lens?
© Silvana Della Camera


 Silvana Della Camera
 Silvana Della Camera
 Silvana Della Camera
 Silvana Della Camera


Leave a Reply
Want to join the discussion?Feel free to contribute!