How to Photograph Star Trails
 Silvana Della Camera
Images with star trails are captivating. They are also easy to accomplish and can be created most anywhere, even in a light-polluted city or your own backyard. Creating a star trail image is a great way to get started in astrolandscape photography. It’s a type of night photography that never gets old. Read on to learn how to photograph star trails.
Digital cameras can see very well in the dark. You don’t need a fast lens for star trails, unlike you would for astrolandscapes. Even a kit lens will do with a focal length of 35mm or less.
Star trails can be the accent to a subject, or become the subject depending on the direction you point the camera. In the northern hemisphere, pointing your camera in the direction of Polaris will generate circular star trails. Similarly, for the southern hemisphere, pointing the camera towards the Southern Cross will also generate circular star trails. Facing east or west will create trails at an angle. Use a compass, either a physical one or an app on your phone to help determine direction.

Star trails are colorful. Stars blaze at a wide array of temperatures and stacking many frames reveal their colors.
There are a couple of schools of thought when it comes to creating star trails. You can stack many 30 second frames or a smaller amount of 4 minute frames. My preference is using 30 second frames. Shooting a 4 minute frame is great, but if someone walks by with a light or a headlight comes into the frame while exposing, that 4 minute frame is blown so it will need to be removed from the stack. This creates a hole in the stacked image. A blown 30 second frame doesn’t impact the star trails as much as the 4 minute one.
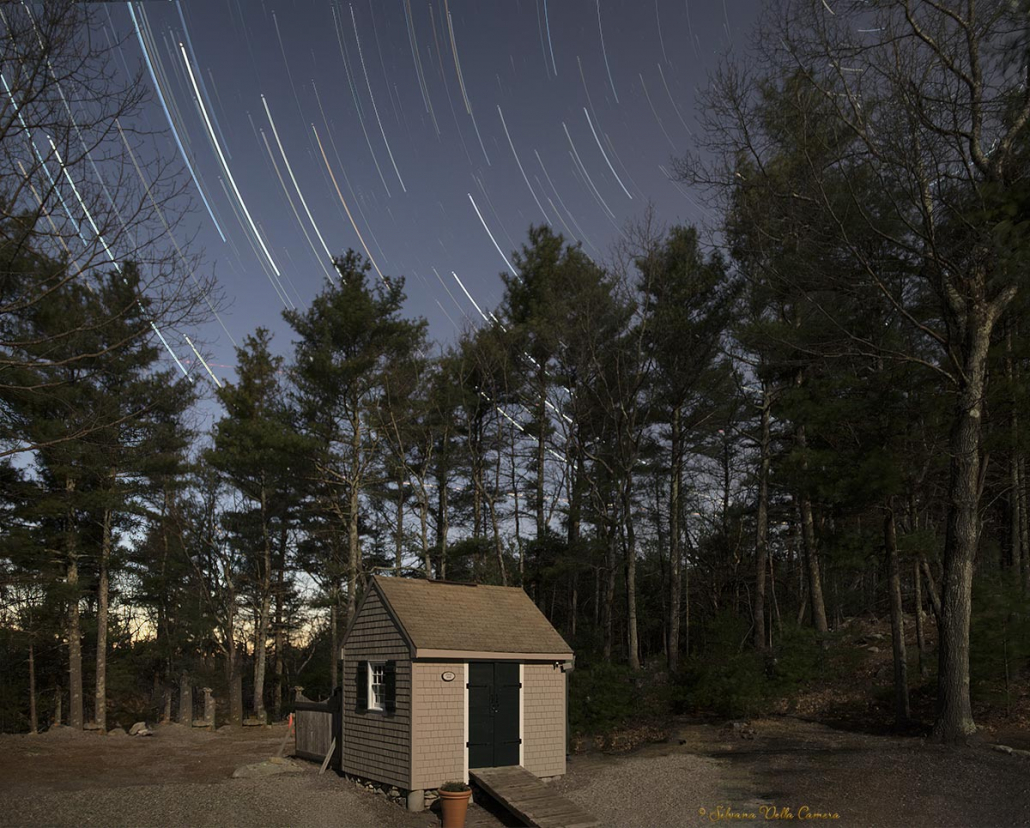
Below, my shed with a backdrop of star trails. Northwest facing, hence the rounded trails. Note the various colors of the stars. Below, a couple of charts illustrating the star colors and their temperatures.
Nikon D850 | 118 frames | 20mm lens | f/2.8 | ISO 800 | 30 seconds | Stacked in Sequator
Below, the colors of stars (image through sciencenotes.org).

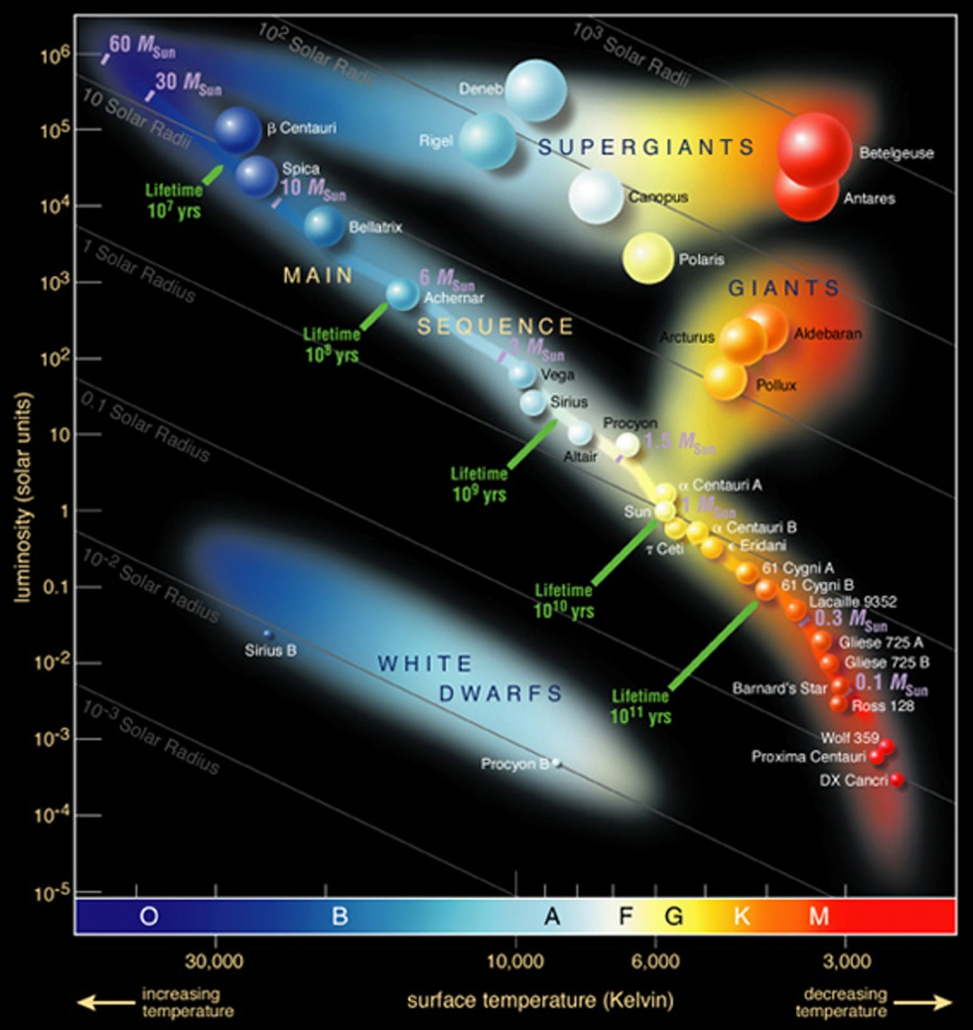
Below, the Hertzsprung-Russell diagram via Chandra/ NASA below shows the size, color and temperature of stars. Our Sun is in the Main Sequence. Main Sequence stars are long lived and unchanged for very long periods of time, unlike the supergiant and dwarf stars that have evolved off the Main Sequence and are no longer stable nor long lived.
So, how do you go about it?
Camera Gear you will need:
- DSLR or mirrorless camera
- 35mm or wider lens
- A sturdy tripod
- Intervalometer (either in-camera or external)
- Formatted card.
- Fully charged battery.
- Shoot RAW and in manual mode.
Use a compass or compass app to help determine the type of star trail based on the direction.
Camera Settings for Star Trails
- Select a foreground object.
- Set your camera to shoot for 30 seconds.
- Set your aperture to its widest.
- Set your white balance to 4200K
- Set your ISO to 100 and take a shot.
- Check your histogram. Do not use the LCD image to determine if your exposure is good or not. It lies!
- If the histogram is too dark (pegged to the left), increase the ISO
- If the histogram is too bright (pegged to the right), increase the aperture.
- Aim for a histogram that is balanced.
- Set your intervalometer to shoot frames with an interval of 2 seconds between each one.
- Internal intervalometer: your interval will be 32 seconds (30 second exposure plus 2 second interval). Set the count to 9999 so you can shut the camera off when you want.
- External intervalometer: your interval will be 2 seconds with a shutter speed at 30 seconds. Set the count to – – (it will continue to shoot until you shut it off)
Plan on shooting for at least 1 hour. The more frames you have, the better the star trails.
Okay, now what?
Now you stack them.
There are free tools to stack images.
Both of these tools work really well to stack images.
I recommend exporting the stacked image as a 16 bit TIFF file for final processing.
Below, an example of a north-facing star trail image. I composed the image setting Polaris in the top center of the frame. Then I stacked star trail frames with a separate foreground frame and blended in post. I chose to shoot the star images a bit out of focus to give the final stack a chalky look to them. The plane and satellite trails are evident as well. I sometimes clone them out, other times I leave them in. It is the reality we are in.
Nikon Z6 | 167 frames | | 24-120mm @ 24mm | f/4.0 | ISO 800 | 30 seconds | Stacked in StarStaX, finished in Photoshop.

Below, sunset and star trails. The brightest trail is the planet Venus. If you look closely at the star trails, you can see the Starlink satellites creating a pattern across the sky. These satellites are ever-increasing.

If you’ve never attempted to photograph the night sky, I hope this gives you the incentive to give it a try. Night photography is relaxing and magical. Be warned, is also addicting.
FAQ
Question: What is the best lens for star trails?
Star trails can be photographed with a wide, super-wide, and even a nifty 50 mm lens. Consider your composition and your distance from the foreground subject. If you want more sky, use a wide or super-wide lens, like a 14 mm. Consider using portrait mode to maximize the amount of sky in your image. This works well for circular star trails which have the greatest visual impact.
Question: How do I focus in the dark?
Use Manual focus only. Auto focus relies on light to focus. In darkness, manual focus is required. Use focus peaking, and use a flashlight to illuminate the foreground to help determine focus.
Night Shades – A Guide to Photography after Dark
Sights Beyond the Spectrum – An Infrared Photography Handbook
Master the Benro Polaris: The Ultimate Handbook for Photographers and Astrophotographers
© Silvana Della Camera
Join the Night Sky Newsletter
Exclusive astrolandscape tips, infrared secrets, and early workshop alerts.
To learn about upcoming workshops and tips on photography, consider subscribing to my website.
Taking photos and want to make them more compelling?
Art isn’t just for walls. Art is also to hold in one’s hands.
 Silvana Della Camera


I have not captured star trails since I switched to digital. Digital does make it easier but you have to capture lots of frames and stack. One “con” of digital is that the sensor heats up and creates more noise and so why to keep the exposures short but lots of frames. With film, it was “all eggs in one basket” and film suffered from “reciprocity failure”.
Some cameras do suffer from overheating sensors, but it was more common in older digital cameras. The newer bodies handle it better. Plus, the noise self corrects when stacking.