
Bolt Hunter Lightning Trigger Review: The Predictive Game-Changer for Storm Photographers?
The Bolt Hunter Lightning Trigger is quite a departure from your standard lightning triggers that exist today. Learn why this trigger has thrown a wrench into the world of photography lightning triggers.
Toto, we’re not in Kansas anymore.
What is a Lightning Trigger?
Well, it’s exactly what it sounds like. It’s a device that senses lightning and trips the shutter of a camera. Using a lightning trigger can increase your chances of successfully photographing a lightning bolt. Once you see the lightning, you’ve missed the shot. These devices have been around since the 1990s.
I joined the Bolt Hunter Lightning Trigger Kickstarter program because of the features that were being built into this trigger. It was designed to increase the frequency of a successful capture. The trigger is set up based upon the constraints of your camera – meaning the shutter lag speed and more, which increases your success of capturing a lightning bolt. As an avid storm lover, supporting this Kickstarter was a no-brainer. Although my Nikon Z9 camera has a pre-release function that would capture lightning, this device captured my interest.
Unboxing the Bolt Hunter Trigger
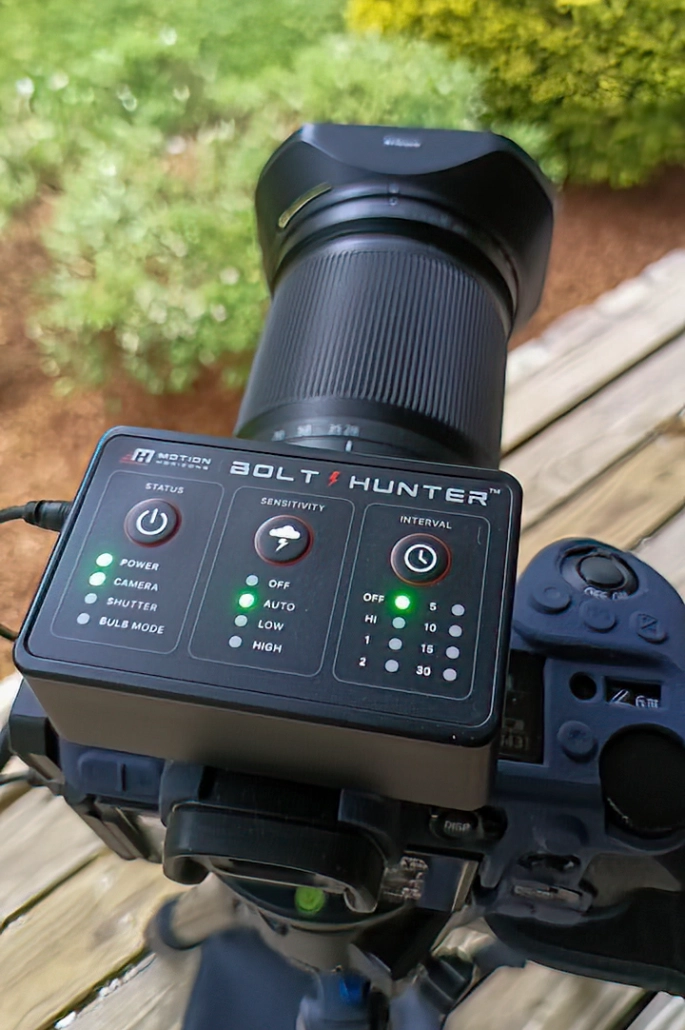
At first look as you unbox it, it is different. It’s smaller than other lightning triggers.
As soon as you pick it up, you can feel that it’s much more than what we have ever used in the past for capturing the elusive lightning bolt.
The build quality is apparent. It has substance when you hold it. It has a built-in rechargeable lithium battery that lasts approximately 48-hours. It is USB-C rechargeable, which means you can charge it on the fly even with a power bank. Battery power is always looming in my mind when photographing lightning. This unit alleviates the paranoia of running out of juice mid-storm.
The price includes a cable for the camera that is selected at checkout. However, since it uses 2.5mm standard cables, you can also add cameras on the fly based on your own requirements or changes in your gear.
I shoot Nikon and have various camera bodies that use either the 10-pin connector or the DC2 connector.
I greatly appreciate the fact that it uses standard cables and not a proprietary one. So, I can choose the camera (and cable) on the fly, and it makes things easier, especially in the field.
Quick Disclosure (Before We Get to My Compulsive Gear Opinions) This post may contain affiliate links to Amazon, Focus on Stars, LRTimelapse, Benro, and Bolt Hunter. If you grab something through them, I might earn a small commission — basically charity for a gal who owns way too many tripods, still drops half of them in the field, used to spend hours hunting for perfect focus in the dark, and misses lightning bolts with embarrassing regularity. No extra cost to you..
As an Amazon Associate, I earn from qualifying purchases. Same deal with Focus on Stars (the diffraction filter that actually lets me nail focus instead of guessing), LRTimelapse (my only defense against total time-lapse disaster), Benro (steady support for my wobbly existence), and Bolt Hunter (the predictive trigger that catches strikes even when my reflexes don’t). I only recommend stuff I actually buy myself and use… even if I use it poorly sometimes.
Your support helps fund more ridiculous experiments in the dark. High five (or whatever I can manage without knocking the camera over).
Setting Up the Bolt Hunter Trigger
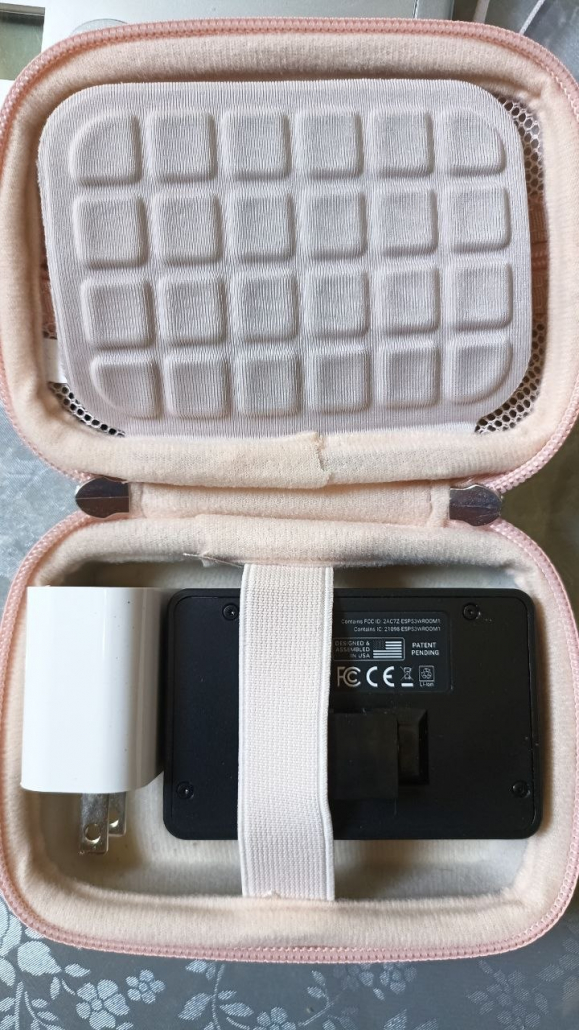
The first step is to charge the trigger with the included USB-C cable and wall block. Once it’s charged, it is ready to be configured for your given camera. Download the app and install it.
With the camera turned off and the Bolt Hunter also turned off, attach the connector cable, then turn on the camera and the trigger.
Open the app. It pairs quickly with the Bolt Hunter. Once communication between your mobile device and the trigger is established, it checks for any firmware upgrades. Since the unit is very new, the upgrades come fast and furious, so always install the firmware upgrade. These are program fixes, and they make things more accurate, so don’t skip over this piece when initially setting up the Bolt Hunter with your camera and when preparing for a storm chase
The Bolt Hunter can also communicate with Bluetooth-enabled cameras, but I prefer wired connections. They are more reliable, and in the case of lightning captures, faster, which translates to a higher hit rate.
What Makes the Bolt Hunter Different
Each camera has its specific shutter responsiveness, and you want to make sure that Bolt Hunter is configured based on your camera’s unique specifications.
Go through the steps. The video that Bolt Hunter provides for the setup is very helpful. Don’t skip this step because you will short-change the accuracy of the Bolt Hunter – defeating the purpose of its purchase. If you are like me and own more than one camera body, go through the steps of configuring each camera you plan to use with the Bolt Hunter. So far, I’ve configured two of my cameras and plan to add others. It was interesting to see the configuration differences between my Z6iii and Z9.
The Bolt Hunter comes with a wall charging block and a USB-C charging cable. It’s a nice, neat little compact kit. I purchased a case for it to protect it as I travel. (Yes, it’s pink, not photographer-standard black!)
Of all the lightning triggers that I’ve tried and owned, I find this trigger to have a substantially higher hit rate in capturing a lightning bolt than the others. I think the quality of build and the fact that it takes into account a camera’s physical particulars greatly improve the outcome.
Another huge factor in my appreciation for this gadget is the fact that it is weather-sealed. Anytime you have a weather-sealed gadget, it gives you peace of mind when you’re out in rainstorms. Since we’re photographing lightning bolts, we’re dealing with very unstable weather. It can start raining wildly, and you want to make sure that rain doesn’t affect your expensive gadgets
I protect my camera from the elements. I use either a large Ziploc bag or a clear cut flower sleeve from the florist and slip it around the camera and lens with a rubber band. There are commercially made camera covers that do the job as well.
The Bolt Hunter also has a time-lapse feature – this is a great option to have for anyone who shoots time-lapse sequences. It will trigger a lightning shot even if the time-lapse is active!
A Comparison
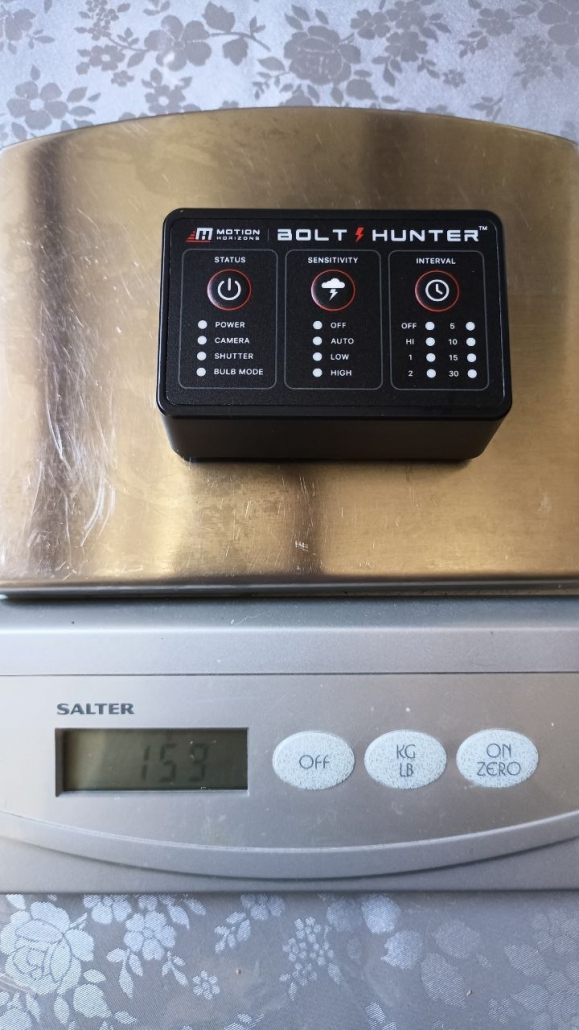
Comparing Bolt Hunter to the MK Controls Lightning Bug Plus, there’s a difference in terms of weight and build quality. The Lightning Bug Plus was weighed with its 9V battery.
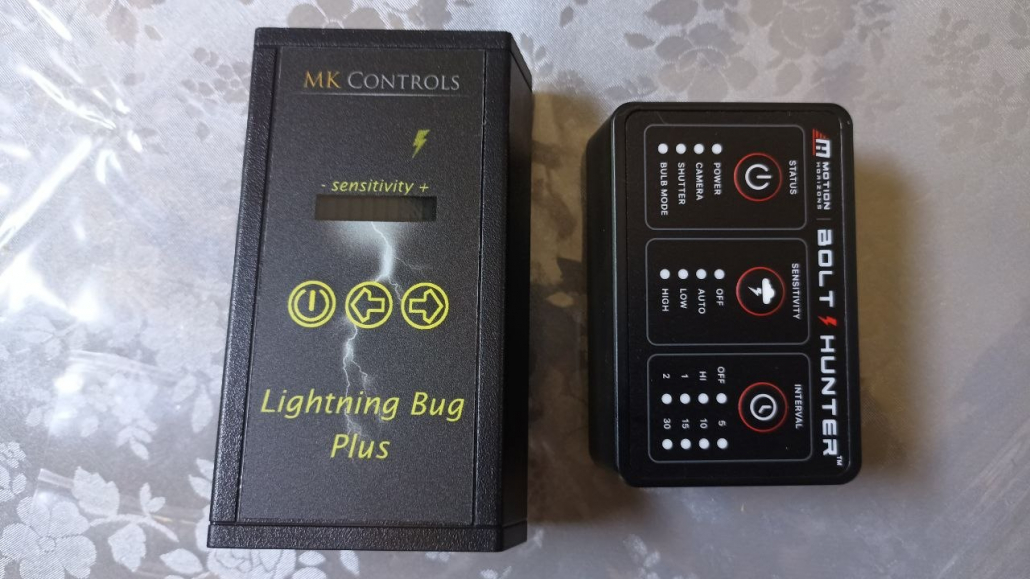
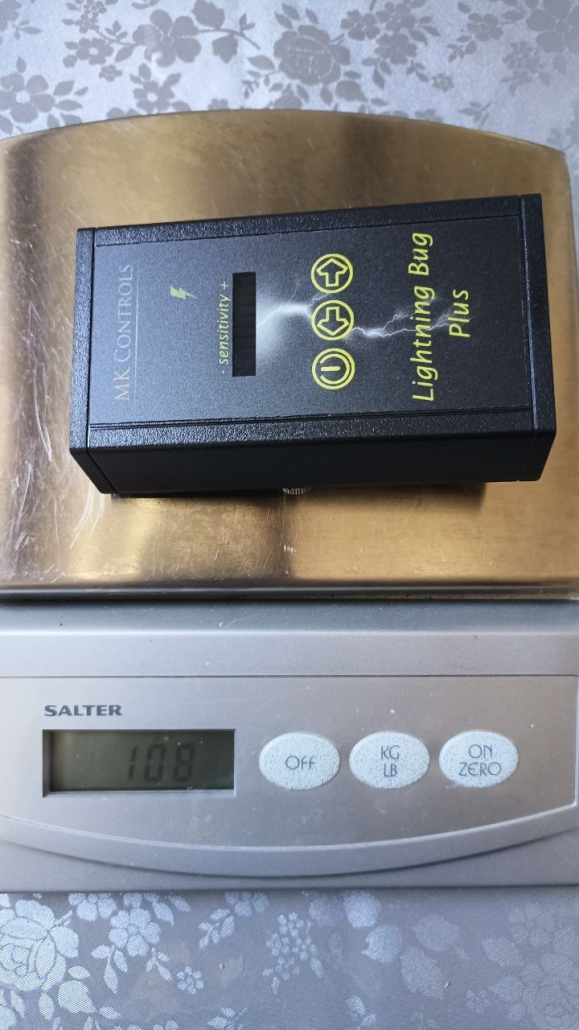
MK Controls Lightning Bug Plus, although in my experience it works better than the other ones on the market, the build quality and effectiveness do not compare to the Bolt Hunter. The Lightning Bug Plus requires a nine-volt battery. So another difficulty is not knowing what the battery level is during a shoot.
Another very positive aspect of Bolt Hunter is that the app gives you all kinds of information in terms of the success rate. It alerts you via the phone if there’s a lightning strike and the shutter was tripped on the camera. It notifies if there is a connection issue, camera power loss, or if the camera has moved or has blown over. It also gives you historical insight into the success rate of the shutter speed, and this helps you achieve a higher hit rate in terms of capturing lightning bolts. Bloody brilliant!
Conclusion
I purchased the Lightning Bug Plus for $199 a couple of years ago. The trigger does work, but it is hit or miss. I bought the Bolt Hunter for $329 (Kickstarter price), and it was successful on the first storm I shot. I enjoy photographing lightning. However, lightning-producing storms aren’t frequent in the New England area, so when one does come around, I find myself scrambling to set up the settings and trigger, more often than not, resulting in a swing and a miss. This trigger makes it a breeze to get ready. The Belt Hunter is not cheap, but this is a clear case of getting what you paid for.
Here are a couple of images of the Bolt Hunter at work. A thunderstorm hit the day after my Bolt Hunter was delivered. This is one of 70 frames it triggered during the storm, shot from my front porch. No guesswork involved. I attached the Bolt Hunter to my Nikon Z6iii, turned on the trigger and camera, set the exposure based on the recommended settings, and fired up the app. It was the easiest and most successful lightning shoot I’ve ever experienced – this, right from the get-go. A shock and quite a delight that it was a success on the first try. I am very excited to use it on my next storm chase.
📷 – Nikon Z6iii | 🔘 – Nikon 28-400mm | 🎞 – ISO 250 | 🔘 – f/5.6 | 🕒 – 1/15 second
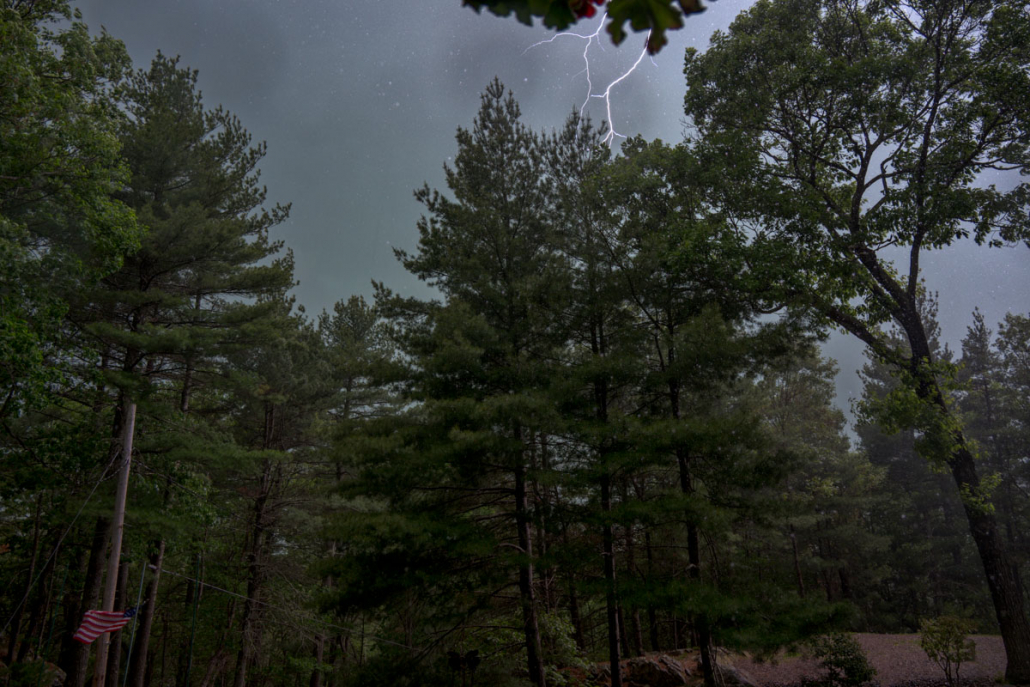
Close up. No, it isn’t snow. It’s the heavy rain caught with a slow shutter speed.

Download the settings sheet to your phone – it’s the same information included on the package insert. It provides a great amount of information on an easy-to-read reference card on how to photograph daylight lightning as well as nighttime lightning.
As far as additional considerations, I recommend using a variable ND filter, like this 1.5-10 stop one. During the day, it’s sometimes difficult to get to 1/15th of a second shutter speed, so a variable ND will help. There will be less fumbling when dealing with changing light conditions, which can oscillate greatly during a daytime storm. I find variable ND filters to be better than a fixed ND when adjustment speed is critical. They save time, so you don’t have to change out one ND filter to replace it with another. Change the amount of density of the filter just by rotating it.
This lightning trigger is for any photographer – pro or amateur – who wants to capture lightning with a substantial margin of success. If you are captivated by lightning photography, consider investing in this trigger.
A big thanks and hearty congratulations to Jeff Boyce for imagining and successfully creating such a fantastic tool!
It’s even better than I dreamed it would be.
© Silvana Della Camera
To learn about upcoming workshops and tips on photography, consider subscribing to my website.
Taking photos and want to make them more compelling?
Art isn’t just for walls. Art is also to hold in one’s hands.


 Silvana Della Camera


Nice review, Silvana. I might have to get me one of these. I currently have the Lightning Bug Plus. I will put this one on my wish list. Ronald
It’s a fantastic trigger. I have the Lightning Bug Plus and there is no comparison. Impressive.
I have two MK Control triggers and neither have ever worked, even at full sensitivity. MK has been non-responsive to my issue. So I am looking for a more reliable unit. I would like to read the manual first. Based on one of your sentences, I read it as you must have a 15th of a second shutter for it to work. That would mean in every shooting situation (mainly daytime) you would need to dial that in, or slower.
Hi Joe,
The 1/15 shutter speed is the recommended speed for daytime- not slower.
It’s the combination of this shutter speed and calibration configuration of the individual camera at which the trigger will nail the capture.
Lightning bolts have many threads. I think the 15th of a second can capture these threads more completely, instead of a faster speed that would probably get a thin or single bolt. I’ve had substantially better success with the Bolt Hunter than I’ve ever had with the Lightning Bug Plus – even at its highest sensitivity. When it did work, the lightning wasn’t impressive. Anemic would be the description.